

Quick answer: The most-used Instagram Reel transitions are the hand-swipe, whip/spin, snap-to-beat, outfit change, object reveal, zoom punch-in, match cut, seamless walk-through, and audio-led J-cuts and L-cuts. Almost all of them work the same way — hide the cut behind fast motion or a sound so your eye can't see the join. Use them to keep pace and reward rewatches, not to delay your hook.
A great transition makes a Reel feel effortless: one moment flows into the next, the beat lands on the cut, and viewers watch it twice just to see how you did it. That rewatch is the whole point — transitions are one of the few editing tricks that directly encourage the looping and re-watching Instagram reads as strong retention. Below are the transitions and effects that actually show up in high-performing Reels, exactly how to shoot and edit each, and, just as importantly, when to leave them out.
The core principle: hide the cut
Nearly every "seamless" transition relies on the same idea. You end clip A with a fast movement or a covered frame, then start clip B with the same movement or covered frame, and cut on the frame where the motion blur (or the object covering the lens) is heaviest. Because the eye can't resolve detail during fast motion, it never registers the join. Master that one concept and most of the transitions below are just variations on it.
9 Reel transitions and how to do them
1. Hand-swipe (hand over the lens)
Shoot: End clip A by sweeping your open palm across and over the lens until it fills the frame; start clip B with your palm already covering the lens, then pull it away to reveal the new scene. Keep the hand speed and direction identical on both sides.
Edit: Cut on the frame where the palm fully covers the lens. No effect needed — the covered frames do the hiding.
2. Snap or clap
Shoot: Snap your fingers or clap on camera. Film the "before" and "after" states separately in the same frame.
Edit: Line the cut up to the exact frame of the snap, and place it on a beat or the audio's transient so the scene changes on the sound. Zoom into your audio waveform to find the peak and cut there.
3. Whip / spin
Shoot: Whip the camera hard left or right (or spin your body) at the end of clip A, and start clip B with the same whip in the same direction. The motion blur is your cover.
Edit: Trim both clips down to their blurriest frames and butt them together. If your app has a directional/whip-blur transition, drop it on the cut to smooth it further.
4. Outfit change
Shoot: Lock your phone on a tripod so the background stays identical. Frame yourself, then jump, spin, or throw something across the lens and land in a new outfit in the same spot.
Edit: Cut on the peak of the movement (the top of the jump, the middle of the spin). Instagram's in-app camera has an Align tool that ghosts your previous frame so you can match your position exactly.
5. Object reveal
Shoot: Pass a prop — a mug, a book, your phone — across the lens until it fills the frame, then reveal the next scene as it moves away. It's the hand-swipe with a prop, and it doubles as a natural way to introduce a product.
Edit: Cut on the frame where the object covers the lens.
6. Zoom / punch-in
Shoot: Physically move toward your subject at the end of clip A, or plan a pinch-zoom into a specific point.
Edit: Keyframe the scale to zoom into a point, then start clip B zoomed in on a matching point and pull back — or use a zoom-blur transition. A subtle digital punch-in on a single clip is also a great way to re-emphasize a line without any cut at all.
7. Match cut
Shoot: Plan two shots that share a shape or composition — a round plate that becomes a round clock, a doorway that becomes a phone screen. Frame them so the matching element sits in the same spot.
Edit: Cut between them cleanly; the shared shape carries the eye across, so no motion blur is needed. Match cuts feel cinematic and are worth planning before you film.
8. J-cut and L-cut (audio transitions)
The pro trick that makes edits feel seamless with no flashy visuals at all. In a J-cut, the next clip's audio starts a beat before its video appears; in an L-cut, the current clip's audio lingers over the next video. Both smooth the join by staggering sound and picture.
Edit: Split (detach) the audio from the video on your timeline, then drag the audio a fraction of a second earlier or later than the picture cut. This is the single most underused transition and it works on almost any Reel.
9. Seamless walk-through
Shoot: Walk toward a doorway, a wall, or an object that briefly blacks out or fills the frame; cut while the frame is blocked, and emerge in a new location on the other side.
Edit: Cut during the dark or blocked frame. This is how creators "teleport" between rooms, cities, or seasons.
Which apps do transitions best
You don't need a desktop to pull these off. CapCut is the most popular free choice — keyframes, auto-transitions, beat detection and ready-made templates cover most of the list above. VN and InShot handle whip, zoom and J/L-cut edits with clean timelines, and Adobe Premiere Rush is a solid mobile option if you already live in Adobe. For the simplest transitions, Instagram's own camera does more than people expect — the Align tool is purpose-built for outfit-change and clone transitions. For a full comparison of features, watermarks and export quality, see our guide to the best apps to edit Instagram Reels.
When transitions help — and when they hurt
Transitions are polish, not a strategy. They help when they:
- Reward a rewatch. A satisfying transition makes people loop the Reel to see how it was done, and loops are pure watch time.
- Keep the pace tight. Cutting on motion or a beat removes dead frames and keeps energy up.
- Serve the story. An outfit change in a fashion Reel or a walk-through in a travel Reel adds meaning, not just flash.
They hurt when they:
- Delay the hook. If your first two seconds are spent setting up a transition instead of giving viewers a reason to stay, you lose them before the payoff.
- Distract from the message. Effect-stacked Reels can feel like a showreel with nothing to say. Retention still comes from the idea.
- Feel gratuitous. A transition on every single cut becomes noise; use them where they earn attention.
The rule of thumb: nail the first two seconds first, then add transitions to sustain the pace — never the other way around. Watch time is the signal Instagram rewards, and a transition only matters if it protects that.
Steal transitions the smart way: download and study frame by frame
The fastest way to learn a transition is to take one apart. When you see a Reel with a transition you love, download it with the free IShort Instagram downloader and scrub through it frame by frame. At full speed a whip or hand-swipe is invisible; slowed to individual frames you can see the exact cut point, which direction the motion goes, and how the audio lines up with the picture. That is how creators reverse-engineer edits that would take hours to guess at.
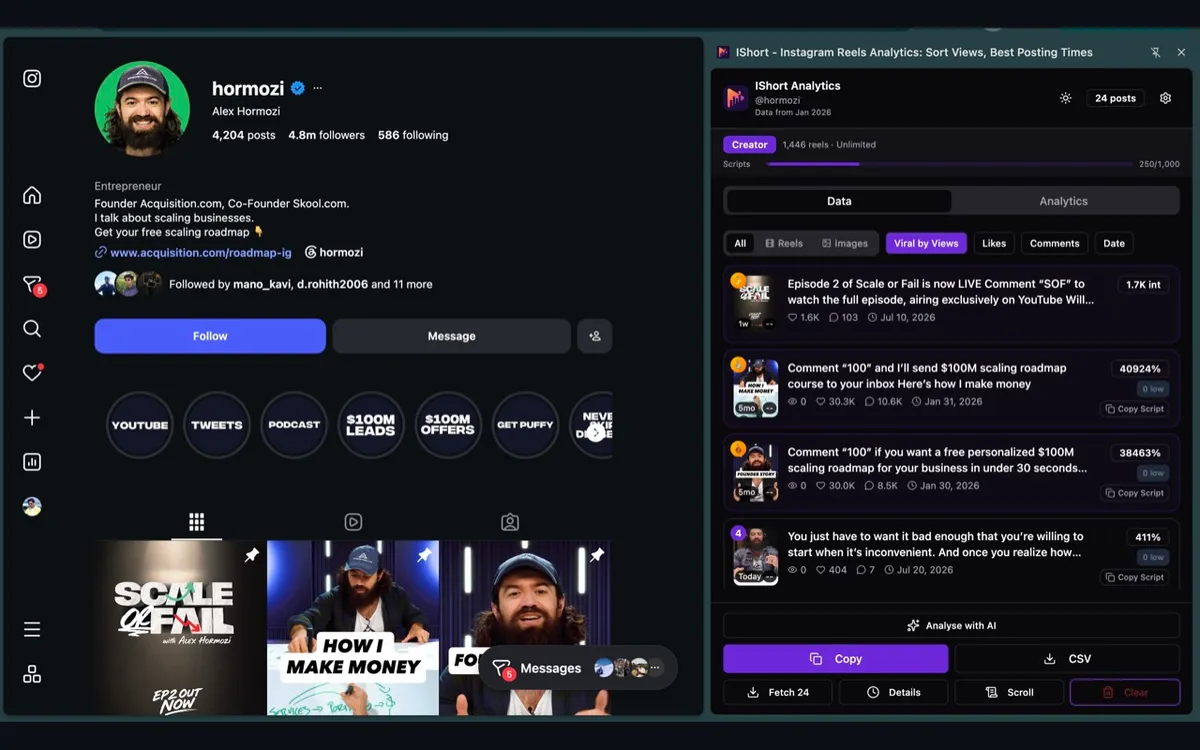
Downloading teaches you the how. The next question is whether transitions are actually working for the creators using them. Not every transition-heavy account gets views — sometimes the editing is the only thing carrying a weak idea. Use IShort to analyze any creator's Reels and sort their content by views: if their most-transitioned Reels aren't their top performers, that's your signal that the idea and hook matter more than the effect. Study the ones that do win, and copy the pattern, not just the transition.
Study any transition frame by frame — free
Install IShort to download the Reels whose transitions you want to learn, then analyze which transition-heavy creators actually get views. Free on Chrome and Edge.
Add to Chrome — Free Get for EdgeFrequently Asked Questions
What are the best Instagram Reel transitions?
The most effective Reel transitions are the ones that hide the cut with motion or sound: the hand-swipe (hand covers the lens), the whip/spin, the snap or clap cut timed to a beat, the outfit change, the object reveal, the zoom punch-in, the match cut, and audio-led J-cuts and L-cuts. None of these are "best" in isolation — the right transition is the one that fits your story and keeps the pace tight.
How do I do a seamless transition on a Reel?
Match the motion and speed on both sides of the cut. Film clip A ending in a fast movement (a hand over the lens, a whip pan, a jump) and start clip B with the same movement, then cut on the blurriest or most-covered frame so the eye can't see the join. For audio, use a J-cut: let the next clip's sound start a beat before its video. Shooting from a locked tripod for outfit or scene changes keeps the background aligned.
What app is best for Reel transitions?
CapCut is the most popular free editor for transitions thanks to keyframes, auto-transitions and templates; VN, InShot and Adobe Premiere Rush also handle whip, zoom and J/L-cut edits well, and Instagram's built-in camera has an Align tool for outfit-change and clone transitions. See our full breakdown of the best apps to edit Instagram Reels for which tool fits your workflow.
Do transitions help a Reel's reach?
Transitions help only when they serve retention — a clean transition that rewards a rewatch or keeps the pace moving can lift watch time, which is the signal the algorithm actually rewards. They hurt when they delay the hook, add friction before the payoff, or feel gratuitous. A flashy transition can't rescue a weak idea; treat it as polish on top of a strong first two seconds.
How can I learn a transition from another Reel?
Download the Reel with the free IShort extension, then scrub it frame by frame to find the exact cut point, the motion used, and how the audio lines up. Studying real examples at that level is the fastest way to reverse-engineer a transition — far more reliable than guessing from full-speed playback.
Final thoughts
Transitions are a craft you learn by watching, taking apart, and repeating. Start with two you can do reliably — the hand-swipe and a J-cut will carry most Reels — then add the whip, outfit change and match cut as you get comfortable. Keep the hook first, let the transition serve the pace, and use IShort to study the creators who do it well so you're copying what actually works, not just what looks impressive.